
Last updated: January 29, 2024
Available with any of the following subscriptions, except where noted:
|
|
The HubSpot tracking code is unique to each HubSpot account and allows HubSpot to monitor your website traffic. The tracking code is automatically included on HubSpot blog pages, landing pages, and website pages.
If you have any externally hosted pages (i.e., pages not on HubSpot), you must install the HubSpot tracking code manually to capture analytics for those pages.
Learn more about how the tracking code allows you to track visitors to your website.
Please note:
- You should not install multiple HubSpot tracking codes on one page. If there are multiple HubSpot tracking codes installed, the first one to load on the page will fire; any subsequent HubSpot tracking codes will not load.
- If your IT admin or web developer is installing the code, they must have a HubSpot user account.
- If you're using a single-page application, check out the developers documentation to set up tracking.
- If you're hosting entire domains or subdomains externally, you must also add your domain(s) and/or subdomain(s) to your settings in HubSpot.
- The tracking code is not supported on AMP sites.
- If your external site is using WordPress, it is recommended to install and use the HubSpot All-in-One Marketing - Forms, Pop-ups, Live Chat WordPress plugin. It will install the HubSpot tracking code on your WordPress site.
- If a visitor has an ad blocker installed, it may interfere with the tracking code.
Copy your HubSpot tracking code
- In your HubSpot account, click the settings icon in the top navigation bar.
- Navigate to your Tracking & Analytics settings:
-
In accounts that only have access to Marketing Starter or HubSpot’s free tools, navigate to Tracking Code in the left sidebar menu.
- For all other subscriptions, navigate to Tracking & Analytics > Tracking code in the left sidebar menu.
-
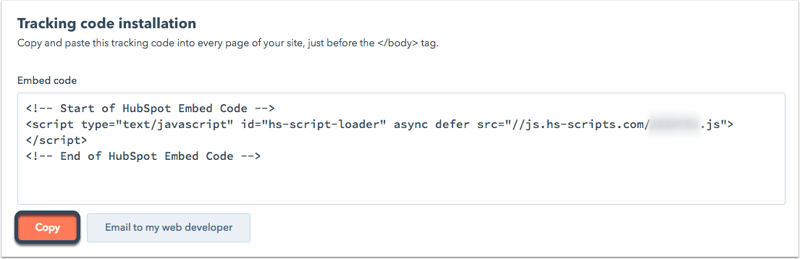
- In the Embed code section, click Copy or click Email to my web developer to send the tracking code to the team member who will be installing it on your site.
- Install the tracking code on your website.
Install the tracking code on your website
To install the tracking code, paste the code before the closing </body> tag in the HTML code for each page of your site. Once you've installed the tracking code, learn how to verify installation and troubleshoot the code.
At the same time, most content management systems and your developers can install code to all pages on your site, such as a footer file that is referenced across all pages. Check with your developers on how they can help do this.
The following sections may also help if you're using a specific content management system.
Install the tracking code on a WordPress website
It is strongly recommended that you install and use the HubSpot All-in-One Marketing - Forms, Pop-ups, Live Chat WordPress plugin. The plugin automatically installs the HubSpot tracking code on your WordPress website for you.
Only if you're unable to install the HubSpot WordPress plugin, you can manually install the HubSpot tracking code:
- Follow the steps above to copy the HubSpot tracking code in your HubSpot account.
- Log in to your WordPress account.
- In the left sidebar menu, navigate to Appearance > Editor.
- In the list of theme files on the right side of the editor, select your Footer.
- Paste in the tracking code and select Update File.
![]()
- If you manually install the tracking code and have a HubSpot Marketing Hub subscription, HubSpot will not be able to differentiate between WordPress posts and pages in its analytics.
- If your website is hosted on WordPress.com, you will not be able to add the HubSpot tracking code to your website unless you are on their Business plan. The other plans (e.g., Premium, Personal) do not allow users to add any JavaScript code.
Install the tracking code on a Shopify site
- Follow the steps above to copy the HubSpot tracking code in your HubSpot account.
- Log in to your Shopify admin dashboard.
- In the left sidebar menu, navigate to Online Store > Themes.
- Click the Actions dropdown menu and select Edit code.
- Select the theme.liquid file for your theme.
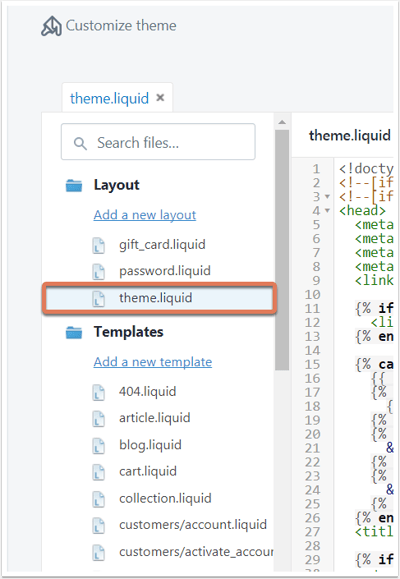
- Paste your HubSpot tracking code just before the </body> tag in this file.
- In the upper right, click Save.
Install the tracking code on a Drupal site
- Follow the steps above to copy the HubSpot tracking code in your HubSpot account.
- Log in to your Drupal admin dashboard.
- In the main navigation menu, navigate to Structure.
- Click Blocks.
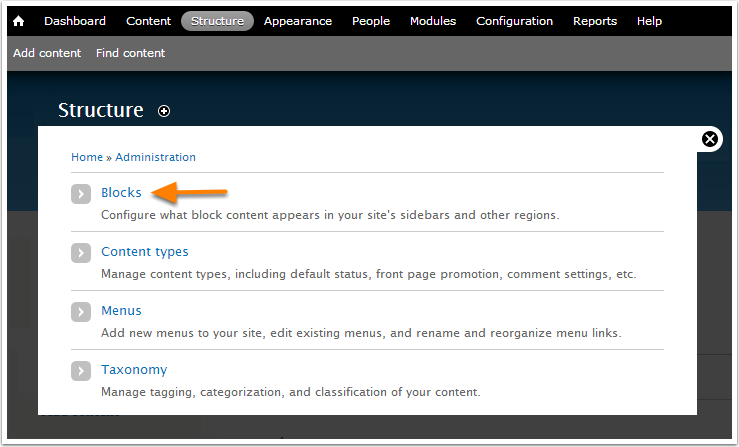
- Click + Add Block.
- Enter the fields for your new block. Paste the tracking code in the Block body field, and then click Save block.
Install the tracking code on a Magento site
Follow the steps above to copy the HubSpot tracking code in your HubSpot account. Then follow Magento's design user guide for instructions on installing third-party JavaScript code in the Header HTML.
Install the tracking code on a Wix site
Use the App Market in Wix to add an HTML widget to your page:
- Follow the steps above to copy the HubSpot tracking code in your HubSpot account.
- Go to Settings in your site's dashboard.
- Click the Custom Code tab in the Advanced section.
- Click + Add Custom Code at the top right.
- Paste the tracking code in the text box.
- Set the Name of the new tool to HubSpot Tracking Code.
- Under Add Code to Pages click the radio button for All pages and use the
dropdown menu to select Load code on each new page. - Under Place Code in section, click the radio button for the Body - end option.
- Click Apply to save your changes.
Install the tracking code on a Joomla site
There are two ways to add your HubSpot tracking code to your Joomla site. With either method, you'll first need to copy your HubSpot tracking code following the steps above.
You can select an extension from the Joomla Extension Directory where you can paste in the HubSpot tracking code. Alternatively, you can follow the steps below to install the tracking code:
- Log in to your Joomla account as an administrator.
- In the main navigation menu, navigate to Extensions > Templates > Templates.
- Click the name of your template and select index.php in the left sidebar menu.
- Paste the HubSpot tracking code directly above the </body> tag.
- Click Save.
Install the tracking code on a Squarespace site
- Follow the steps above to copy the HubSpot tracking code in your HubSpot account.
- Log in to your Squarespace account.
- In the left sidebar menu, navigate to Settings.
- In the Website section of the menu, navigate to Advanced, then select Code Injection.
- Paste the tracking code into the Header field.
- In the upper left, click Save.
Install the tracking code using Google Tag Manager
- Follow the steps above to copy the HubSpot tracking code in your HubSpot account.
- In a new browser tab or window, log in to your Google Tag Manager account.
- Select your container.
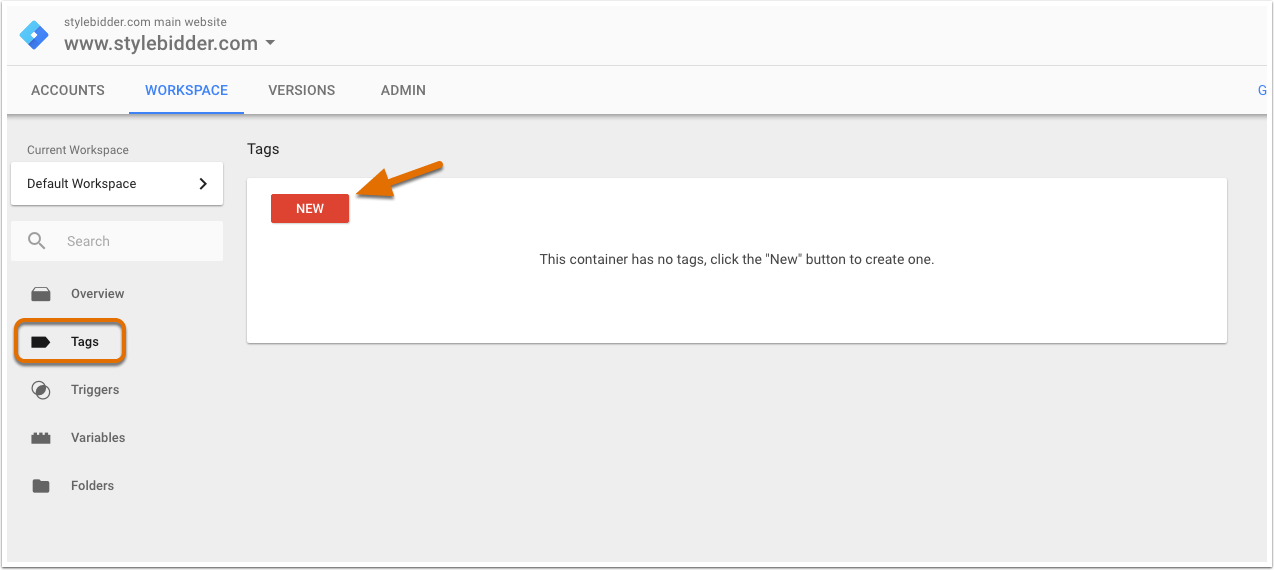
- In the left sidebar menu, navigate to Tags.
- Click New.
- Click Tag Configuration.
- For the Tag type, choose Custom HTML Tag. Then, give your tag a name.
- Paste the tracking code in the HTML field.
- Below Tag Configuration, click Triggering to set up a firing rule. If you don't set up a firing rule, the tag will not fire and HubSpot analytics data will not be collected.
- For the tag to fire on all pages with the Google Tag Manager code installed (recommended), select the option for All Pages.
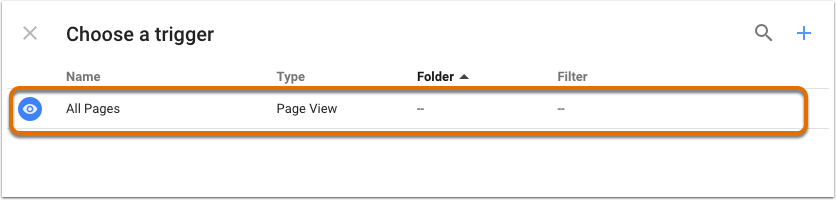
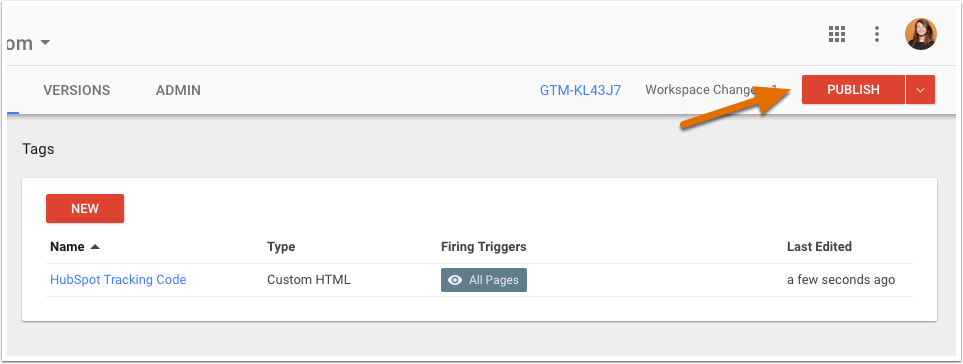
- Click Save to save your new tag.
- In the upper right, click Publish to save your container and tags.
- If you haven't already done so, install Google Tag Manager on your website.
Additional code to bucket data into HubSpot page types
