
Last updated: April 4, 2024
Available with any of the following subscriptions, except where noted:
|
|
To add or update data in bulk, you can import files into HubSpot. You can import records, such as contacts and companies, or activities, such as an email sent to a contact or a meeting for an ongoing deal.
The following are the types of imports you can complete, and the objects and activities supported:
- Single object or activity import: import to create and/or update one object or activity. In a single object import:
- You can create and/or update contacts, companies, deals, tickets, calls, products, and custom object records.
-
- You can create, but not update, tasks.
- Multiple object and activity import: import to create, update, and/or associate multiple objects and activities. You can import multiple objects and activities in one file, or two objects/an object and an activity in two separate files. In a multiple object import:
- You can create and/or update contacts, companies, deals, tickets, calls, and custom object records. You can create and/or update line items, but they must be associated with deals.
- You can create, but not update, emails, meetings, notes, and tasks. Emails, meetings, and notes must be associated with an object.
You can follow the instructions outlined below for all imports, but there are steps that only apply to certain import types (e.g., steps to associate records in a multiple object import). For more guidance, review import file requirements.
Before you import
Before you start an import:
- You must have Import permissions, and Edit permissions for the object record you're importing into HubSpot.
- Learn more about objects, records, properties, and how to manage your CRM database in HubSpot.
- Set up your import files and confirm you have all the required fields. Properly setting up your files helps you avoid import errors or incorrect data being added to your CRM. You can refer to sample import files to help you get started.
- There are additional ways to create, sync, or associate records that you can consider:
- For contacts and companies, you can turn on the setting to automatically create and associate companies with contacts based on the contact’s email domain. If you have contacts with email domains that are different from their companies' domains, or if you're importing other objects, follow the instructions to associate your records via import.
- If you have data in another system and want to set up a two-way sync, learn how to connect and use HubSpot data sync rather than importing.
Import records and activities
To watch an overview on how to import into your HubSpot account, check out the video below:
Once you've set up your files, to import into HubSpot:
- Click Import in the top right of any object home page, or access your import settings:
- In your HubSpot account, click the settings icon in the top navigation bar.
- In the left sidebar menu, navigate to Import & Export.
- Click Go to import.
- On the Imports page, click Start an import.
- Select File from computer, then click Next. You can also select Repeat a past import to complete an import with the same properties as a previous import.
- Depending on the type of import, select the number of files and objects/activities:
- Single object or activity import:
- Select One file, then click Next.
- Select One object, then click Next.
- Select the object or activity in your import file. Calls and tasks are the only activities that can be imported on their own.
- Single object or activity import:
-
- Multiple object or activity import in one file:
- Select One file, then click Next.
- Select Multiple objects, then click Next.
- Select the objects and activities in your import file, then click Next.
- Multiple object or activity import in one file:
-
- Multiple object or activity import in two files:
- Select Multiple files with associations, then click Next.
- Select the two objects or object and activity, then click Next.
- Multiple object or activity import in two files:
- For each object or activity, click choose a file, then select your import file.
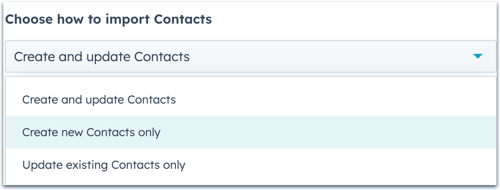
- Click the Choose how to import [objects/activities] dropdown menu for each object/activity and select how to import your data:
-
- Create and update [records/activities]: the import will create new records and activities, as well as identify and update existing records. To create new records or activities, your file must contain the required properties for that object/activity. To update existing records, your file must contain a unique identifier.
- Create new [records/activities] only: the import will only create new records and activities. Existing records in the import file will be ignored. To create new records or activities, your file must contain the required properties for that object/activity.
- Update existing [records/activities] only: the import will only update existing records. New records or activities in the import file will be ignored. To update existing records, your file must contain a unique identifier.
Please note: emails, meetings, notes, and tasks cannot be updated via import, regardless of how you choose to import the data.
- If you're importing same object associations, select the Same-object associations checkbox.
- If you're importing data in a language other than your default language, click the Select the language of the column headers in your file dropdown menu and select the language. Selecting the correct language enables HubSpot to better match your column headers to existing default properties. If there is no match in your selected language, HubSpot will search for an English property to match.
- Click Next.
- If you’re importing and associating multiple objects in two files, indicate which column is included in both files:
- Click the Common column headers found in your files dropdown menu and select the name of the common column.
- Click the Which object is [common column] the unique key for? dropdown menu, then select the object that the property should be imported to. For example, if you're importing contacts and companies and are using Company name as the common column, select Company to upload this data to company records.
- Click Next.
- On the Map columns in your file to [object/activity] properties screen, HubSpot will map the columns in your file to the selected object or activity's properties based on the header, the header language, and the property name. If you’ve imported two files, there will be a mapping page for each object or activity.
- The Mapping Guide displays the properties required to create and/or update the objects or activities. If your file is missing any of the properties needed to complete the goal of your import (e.g., you chose to update existing deals but didn’t include a Record ID column), you should fix your import file and restart the import to avoid errors.
- In the Preview Information column, there’s a preview of the first three rows from your spreadsheet.
- If there are no errors detected, there will be a checkmark in the Mapped column.
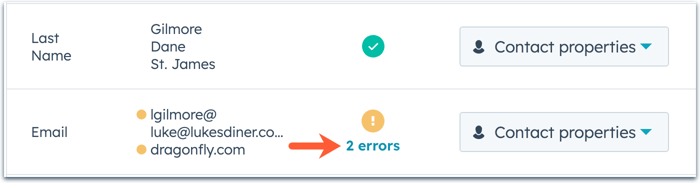
- If certain errors are detected, there will be an alert icon in the Mapped column with the number of errors. Click [x] errors to learn how you can resolve the errors.
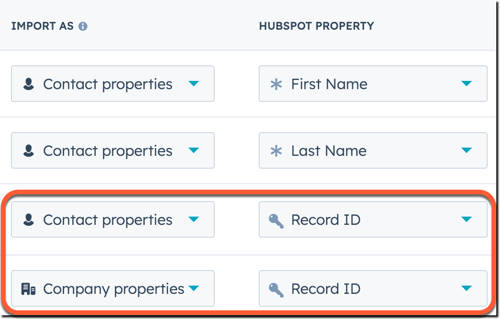
- If any columns were mapped to the wrong object or activity's properties, click the dropdown menu in the Import as column then select the correct [Object/Activity] properties.
- If you're importing to associate same object records, map the associated records' unique identifier property as an association. To do this, in the row of the unique identifier:
- In the Import as column, click the dropdown menu, then select Association.
- In the HubSpot property column, click the Choose property dropdown menu, then select the unique identifier property (e.g., Email, Record ID).
- If any columns don't map to an existing property, or mapped to the wrong property, click the dropdown menu in the HubSpot Property column. In the dropdown menu, you can do one of the following:
- To map the column to an existing property, search for and select an existing property. You can hover over a property to view its details and ensure you're mapping to the correct property before selecting.
- To set up a new custom property (objects only), click Create new property, then set up your property in the right panel. The data in the column will be mapped to this new custom property.
- To skip importing data from an individual row, click the dropdown menu in the Import as column, then select Don't import column. To skip importing data from all unmapped columns, select the Don't import data in unmapped columns checkbox in the bottom right.
- If you’re updating existing records, or want to avoid duplicates while associating cross-object records, ensure you’ve mapped the correct unique identifier (e.g., Record ID, email, company domain name, or custom unique value properties):
- Record ID: map the column to Record ID in the HubSpot property column. If a row in your file doesn't contain a value for Record ID, a new record will be created.
-
- Email (contacts only) or Company domain name (companies only): map the column to the corresponding property in the HubSpot property column.
- Custom property that requires unique values (contacts, companies, deals, tickets, and custom objects only): if you’ve created a property that requires unique values, map the column to that property in the HubSpot property column. If you’re importing multiple unique value properties, you’ll select which property to use as the identifier on the Details page before finishing your import.
Please note: when using certain unique identifiers, the following behavior applies:
- If you use a custom property that requires unique values as the unique identifier:
- For companies, the Company domain name property will no longer require unique values.
- For contacts, the Email property will still require unique values.
- For contacts, if you use an existing contact's secondary email as the unique identifier, the secondary email will not replace the primary email as long as you do not include the Record ID column in your file. If you include both the secondary email and Record ID in your file, the secondary email will replace the primary email when imported.
- If you're updating records, select the checkboxes in the Manage existing values column to prevent the import from overwriting records’ existing property values. When this is selected for a property, the import won't update the property for records that already have a value, but will update the property for new records or existing records with no current value for the property.
- To prevent the import from overwriting existing values for individual properties, select the Don’t overwrite checkbox in the row of the property.
- To prevent the import from overwriting existing values for all properties included in the import, select the checkbox at the top of the table.
- If you’re importing and associating objects, to import association labels (Professional and Enterprise only):
- Click the dropdown menu in the Import as column, then select Association label. Importing a new association label will not overwrite an existing association label. The imported label will be added to the record as an additional association label. Learn how to manually remove an association label from a record.
- When importing two objects, the HubSpot property column will automatically populate the object relationship for the objects you're importing (e.g., Contact and Company). If you're importing more than two objects, select the two objects whose relationship the association labels describe.
.gif?width=700&height=97&name=map-association-label%20(1).gif)
- Once all columns are mapped or set to Don't import column, click Next. If you've imported two files, map the second object or activity's properties, then click Next.
- Enter your import details:
- Enter an Import name.
- If your files include multiple unique value properties (contacts, companies, deals, tickets, custom objects only), click the Property to use to find existing [objects] dropdown menu and select the property you want to use to update or deduplicate records.
- If you're importing contacts:
- To automatically create a list of the imported contacts, select the Create a list of contacts from this import checkbox. Even if you've imported only to add existing contacts to a list (i.e., a file with Email or Record ID values but no new property values), the records will still be included as Updated records on the import history table and the individual import's summary.
- To agree that contacts expect to hear from you and that your import file does not include a purchased list, select the checkbox. Learn more about HubSpot's acceptable use policy.
- If you've turned on data privacy settings in your account, click the Set the legal basis for processing a contact's data dropdown menu and select a legal basis of processing.
-
- If you're importing a file with a date property, click the Date format dropdown menu and confirm how the date values in your spreadsheet are formatted.
- If you're importing a file with a number property, click the Number format dropdown menu and confirm which country's number format to use for your data.
- Once you've set the options for your import, click Finish import.
Once imported, you can view new and updated records each object's home page, new tasks on the tasks index page, or new activities on records. If your import contained errors, learn how to resolve import errors. You can also view, analyze, and complete actions with your previous imports, including creating a list, viewing, or deleting imported records.
