
Last updated: April 12, 2024
Available with any of the following subscriptions, except where noted:
|
|
|
|
|
|
With the URL redirects tool, you can redirect traffic from any URL on a HubSpot-hosted domain to any other URL. You can also set up rules to dynamically update the structure of URLs with flexible pattern redirects. To update URL redirects in bulk, learn how to upload redirects.
- Published quotes cannot be redirected from one domain to another. For example, if you host on your quotes on www.website.com, but later redirect that domain to www.new-website.com, quotes that were hosted on the original domain will not be redirected and will instead become error pages.
- File URLs cannot be redirected.
Add a new URL redirect
- In your HubSpot account, click the settings icon in the top navigation bar.
- In the left sidebar menu, navigate to Content > Domains & URLs.
- Click the URL Redirects tab.
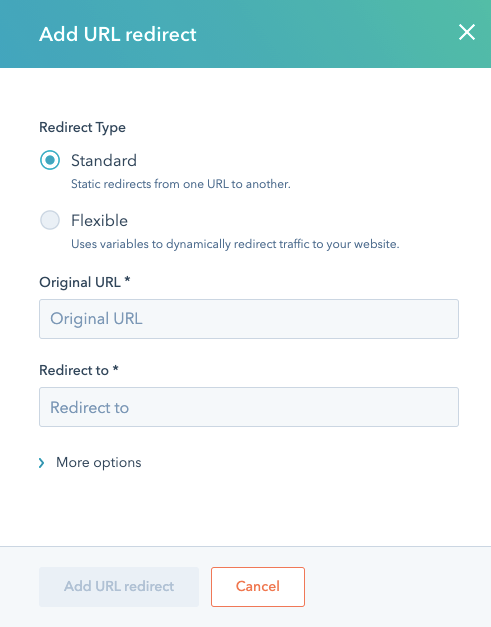
- In the upper right, click Add URL redirect.
- In the right panel, select the Standard or Flexible redirect type. A standard redirect is used to redirect one URL to another. A flexible redirect updates URLs based on the way they're structured.
- In the Original URL field, enter the full URL or URL path that you want to redirect.
- In the Redirect to field, enter the URL of the page you want the original URL to redirect to. When redirecting to an external page that's not hosted on HubSpot, be sure to enter the full URL, including http:// or https:// (e.g., http://www.domain.com/name-of-page).
- Click Add URL redirect.
Please note: HubSpot automatically encodes URLs with special characters. For example, the tool will automatically convert é into %C3%A9 when it's added.
Manage URL redirects
On the URL Redirects dashboard, you can search, filter, or sort your URL redirects.
- To filter redirects based on how they were created, click the Display dropdown menu and select an option:
- Manual redirects: display redirects created by users in the URL redirects tool.
- System redirects: display redirects created automatically when the URL of a published page, blog, or blog post was updated. These cannot be edited.
- To view the redirects a specific user created, click the Created by dropdown menu and select that user.
- To locate a specific redirect, in the search bar, enter a URL or part of a URL that exists in the Original URL or Redirect to field of an existing redirect.
- To download all your URL redirects in CSV file, in the upper right, click Export.
- To customize the fields that appear in your URL redirects dashboard, in the upper right, click Switch columns. Select the checkboxes next to your column options. Only four column options may be selected at a time.
- To edit a URL redirect, click the Actions dropdown menu, then select Edit. Or, select the checkboxes next to the redirects that you want to edit, then click Edit at the top of the table.
- To delete a URL redirect, click the Actions dropdown menu, then select Delete. Or, select the checkboxes next to the redirects that you want to delete, then click Delete at the top of the table.

Please note: if a redirect isn't working as expected, you may need to clear your browser cache. It can take up to 48 hours for a redirect to propagate
Customize a URL redirect's advanced options
For more control over your redirect's behavior, click More options while creating or editing a URL redirect.
- Redirect style: sets the conditions under which the URL will redirect.
- Permanent (301): redirect one page URL to another URL. This is the default selection for new redirects.
- Temporary (302): temporarily redirect one page to another URL. This type of redirect is often used to temporarily redirect traffic for website maintenance or a website redesign.
- Proxy: redirect the content of your live page without changing the URL displayed on the visitor's web browser. This type of redirect is often used to share a file that's hosted on a specific directory outside your main site.
- Priority: by default, new redirects are assigned the lowest priority. To customize this setting, clear the Assign lowest priority checkbox and enter a custom value.
- If more than one redirect exists for the original URL, the redirect with the lowest priority will be applied. For example, if there are two URL redirects that apply to a URL - one with a priority of 100 and the other with a priority of 1 - the redirect with a priority of 1 would be applied.
- Match query strings: only redirect the page from the exact original URL entered. This means that if the original URL has any additional parameters, the redirect won't be applied. This option is not selected by default.
- Ignore trailing slash: apply the redirect whether the original URL includes a forward slash / at the end or not. This option is selected by default.
- Ignore protocol (HTTP or HTTPS): apply the redirect whether the original URL starts with http:// or https://. This option is selected by default.
- Disable redirect if a page exists at the redirected URL: apply the redirect only when the original URL is unpublished. If the original URL is live, this redirect won't be applied. This option is not selected by default.
- Note: explain why this URL redirect was created.
When you have edited your redirect's advanced options, click Update URL redirect to apply your changes.

